I found mold in my bathroom last spring and felt that instant gut punch of dread.
You’re probably staring at a patch of black or green growth right now, wondering if you can handle this yourself or if you need to call someone. I’ve been there.
Here’s the truth: most small mold problems are manageable if you know what you’re doing. But you need the right approach and the right safety gear.
I put together this guide for removing mold livpristhome after dealing with my own situation and talking to remediation specialists about what actually works. Not the internet myths. The real process.
This article walks you through assessing your mold problem, protecting yourself properly, and removing mold from non-porous surfaces the right way.
We focus on practical home solutions at Liv Prist Home. We test methods in real living spaces and consult with professionals to make sure what we share actually keeps your home safe.
You’ll learn how to tell if your mold issue is DIY-friendly or needs a pro. You’ll get the exact steps for safe removal. And you’ll know what mistakes to avoid that could make things worse.
No scare tactics. Just a clear plan to take back your space.
Understanding Mold: What It Is and Why It’s In Your Home
You’ve probably seen it. That dark spot creeping up your bathroom wall or the fuzzy patch behind your washing machine.
Mold is just a fungus. Nothing more complicated than that.
In nature, it does something useful. It breaks down dead leaves and rotting wood. But when it shows up in your house? That’s a different story.
Here’s what most people don’t realize. Mold doesn’t just appear randomly. It needs three things to grow: moisture, something to eat, and the right temperature.
The moisture usually comes from somewhere specific. A leaky pipe you haven’t noticed. High humidity because your bathroom fan doesn’t work. Condensation on cold windows in winter.
For food, mold isn’t picky. It’ll eat drywall, wood, carpet, even dust. If it’s organic, mold can feed on it.
Now let’s talk about what’s actually growing in your house.
You’ve got Aspergillus, which loves damp walls. Cladosporium shows up on fabrics and wood. Penicillium (yes, related to the antibiotic) grows on water-damaged materials.
Then there’s Stachybotrys chartarum. Black mold. The one everyone freaks out about.
But here’s what the guide for removing mold Livpristhome won’t always tell you. All mold should concern you equally. Black mold gets the headlines, but any mold growing in your living space needs to go.
The health stuff is real. Sneezing, runny nose, red eyes. If you have asthma, mold can trigger attacks. Some people get respiratory irritation that won’t quit.
The good news? Once you understand what mold needs to survive, you can stop giving it what it wants.
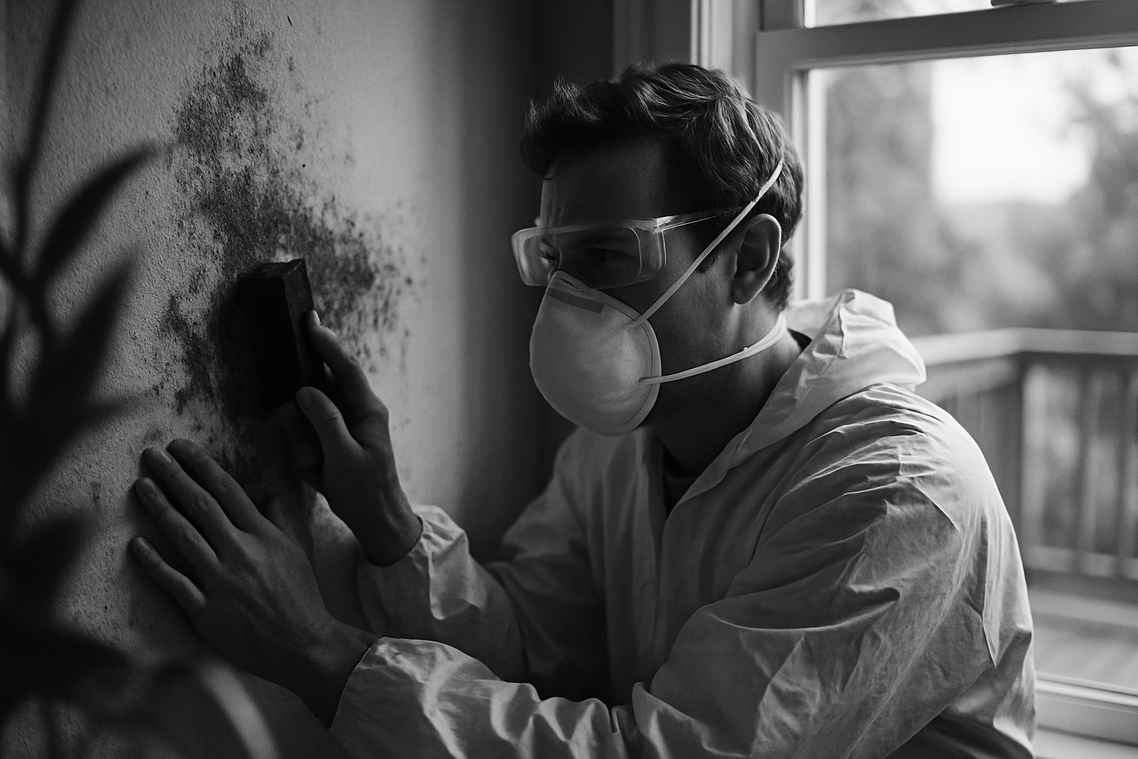
Safety First: Your Non-Negotiable Preparation Checklist
Here’s my take.
Most people skip this part. They see a patch of mold and grab a spray bottle and some paper towels like they’re wiping down a countertop.
That’s a mistake.
When you disturb mold, you’re releasing millions of spores into the air. You’re making the problem worse and putting yourself at risk. I’ve seen people turn a small bathroom issue into a whole-house contamination because they didn’t prep right.
This step isn’t optional.
You need the right gear:
- N-95 or P-100 respirator mask (not a dust mask, a real respirator)
- Non-vented safety goggles
- Long rubber or neoprene gloves
- Disposable full-body coveralls
I know it sounds like overkill. But breathing in mold spores can mess you up for weeks.
Next, contain the area.
Seal off the room with plastic sheeting and tape over doorways. Turn off your furnace or AC so spores don’t circulate through your whole house.
Then ventilate to the outdoors. Put a box fan in a window and point it outside.
This is the foundation of any safe mold removal. Skip it and you’ll regret it later when you’re coughing for days or finding mold in rooms you never touched.
Check out this guide for removing mold livpristhome for the complete process.
The Step-by-Step Mold Removal Process for Hard Surfaces

Let me walk you through this the right way.
I’ve seen too many people scrub mold off their bathroom tiles only to watch it come back two weeks later. They did the work but skipped the most important part.
Step 1: Fix the Moisture Source
This comes first. Not second. Not after you clean.
Find where the water is coming from and stop it. A leaky pipe under the sink. Condensation from poor ventilation. Whatever it is, fix it now.
If you skip this step, you’re just wasting your time. The mold will be back before you know it.
Step 2: Assemble Your Cleaning Kit
You’ll need:
- Stiff brushes
- Spray bottles
- Clean rags (ones you can throw away)
- Heavy-duty trash bags
- Your cleaning solution
Get everything ready before you start. You don’t want to stop halfway through to hunt for supplies.
Step 3: Choose Your Cleaning Solution If this resonates with you, I dig deeper into it in House Cleaning Guide Livpristhome.
Here’s what actually works.
Soap and Water: Good for non-porous surfaces like tile or glass. Start here if the mold isn’t too bad.
Distilled White Vinegar: This mild acid kills most mold types. Pour it straight into a spray bottle. Don’t dilute it.
Hydrogen Peroxide (3% solution): Works as an antifungal and antiviral. It’s gentler than bleach but still effective.
Commercial Mold Removers: These can work well but read the instructions carefully. Every product is different.
A Note on Bleach
I know everyone reaches for bleach first. But here’s the problem.
Bleach only kills surface mold. It doesn’t get into porous materials. The fumes are harsh and it’s not safe for most DIY situations. Skip it unless you really know what you’re doing.
Step 4: The Removal Technique
Spray your solution on the moldy area. Let it sit for a few minutes (this matters more than you think).
Then scrub hard with your stiff brush. Really get in there. Wipe everything clean with disposable rags.
Whatever you do, don’t just paint over mold. That never works.
Step 5: Dry Completely
This is where most people get lazy.
Use fans or a dehumidifier to dry the area completely. Touch the surface. If it feels even slightly damp, keep drying.
Mold loves moisture. Don’t give it what it wants.
Step 6: Safe Disposal
Put all your used rags, brushes, and plastic sheeting in sealed heavy-duty garbage bags. Tie them up tight and get them out of your house immediately.
You just removed mold. Don’t let it spread to other areas now.
Want more cleaning strategies that actually work? Check out the best house cleaning tricks livpristhome has to offer.
The whole process takes time but it works. I’ve used this guide for removing mold livpristhome on everything from shower walls to basement floors.
Just remember that first step. Fix the moisture or you’ll be doing this again next month.
When to Call a Professional Mold Remediation Service
I’ll be straight with you.
Most people wait too long to call for help.
They see a patch of mold and think they can handle it. And sometimes they’re right. A small spot on your bathroom tile? Sure, you can probably tackle that yourself.
But there’s a line. Cross it and you’re risking your health and your home. I expand on this with real examples in Best House Washing Tricks Livpristhome.
The EPA is clear on this. If you’re dealing with more than 10 square feet of mold (that’s roughly a 3×3 foot area), you need professional help. That’s not a suggestion. That’s based on years of data showing DIY attempts on larger areas often make things worse.
Here’s what most livpristhome house tutorials by livingpristine won’t tell you.
You can’t see most of the problem.
A study from the American Industrial Hygiene Association found that visible mold represents only about 30% of the actual growth in most cases. The rest is hiding in your walls, under floors, or in your HVAC system.
That musty smell you can’t find? That’s mold growing somewhere you can’t reach.
Watch for these red flags:
The mold came from sewage or contaminated water. This isn’t just mold anymore. It’s a biohazard. The CDC reports that sewage-related mold contains bacteria and pathogens that require specialized equipment to remove safely.
Someone in your house has asthma or a weak immune system. Research published in the Journal of Allergy and Clinical Immunology shows that mold exposure can trigger severe reactions in these individuals, even from “small” amounts.
You suspect growth in your HVAC system. Once mold gets in there, it spreads spores throughout your entire home every time the system runs. A 2019 study found that 40% of homes with HVAC mold contamination had residents reporting respiratory issues.
I’ve seen people try the guide for removing mold livpristhome approach on problems that needed professionals. They spent money on supplies, wasted weekends, and still ended up calling someone anyway.
Know your limits. A small patch is manageable. Anything beyond that? Make the call.
Keeping Mold Away for Good: Proactive Prevention Strategies
You don’t want to deal with mold twice.
I learned this the hard way. You can scrub every surface and think you’re done, but if you don’t change what caused it, you’re just buying time.
Here’s what actually works.
Keep your humidity below 50%. Get a hygrometer (they’re like ten bucks) and check your levels. If you’re consistently above that number, you need a dehumidifier. Run your AC when it’s humid out. This isn’t optional.
Ventilate everything. Turn on exhaust fans when you cook or shower. Make sure your dryer vents outside, not into your basement or crawl space. Open windows when the weather allows it.
I know someone who never ran their bathroom fan because they didn’t like the noise. Guess what grew on their ceiling?
Check for leaks monthly. Look under sinks. Walk your property after heavy rain. Inspect your roof once a season. A small leak today becomes a mold problem in two weeks.
Dry spills fast. You’ve got 24 to 48 hours before mold starts growing. Spilled something on carpet? Don’t just blot it. Get a fan on it. Had a pipe burst? Everything needs to dry completely.
If you want more details on tackling existing problems, check out this guide for removing mold livpristhome.
The truth is, prevention beats cleanup every single time.
A Healthier, Mold-Free Living Space
You found mold in your home and that initial panic hit hard.
I get it. Mold looks scary and the health risks are real.
But here’s the truth: you can handle minor mold problems yourself if you know what you’re doing.
This guide for removing mold livpristhome gives you a clear action plan. You now know the safety steps to take and the cleaning techniques that actually work.
The key is addressing the moisture source first. Without fixing that, the mold just comes back.
You came here worried and unsure. Now you have a strategy you can trust.
Start by inspecting your home today. Look for signs of moisture problems in bathrooms, basements, and around windows. Get your safety gear ready (respirator, gloves, and eye protection).
Small mold patches are manageable when you’re prepared. You don’t need to fear every dark spot you find.
Take that first step and check your space. The sooner you catch moisture issues, the easier they are to fix.
 Founder & Creative Director
Tavien Veyland has opinions about liv-inspired living concepts. Informed ones, backed by real experience — but opinions nonetheless, and they doesn't try to disguise them as neutral observation. They thinks a lot of what gets written about Liv-Inspired Living Concepts, Smart Home System Integrations, In-Depth Guides is either too cautious to be useful or too confident to be credible, and they's work tends to sit deliberately in the space between those two failure modes.
Reading Tavien's pieces, you get the sense of someone who has thought about this stuff seriously and arrived at actual conclusions — not just collected a range of perspectives and declined to pick one. That can be uncomfortable when they lands on something you disagree with. It's also why the writing is worth engaging with. Tavien isn't interested in telling people what they want to hear. They is interested in telling them what they actually thinks, with enough reasoning behind it that you can push back if you want to. That kind of intellectual honesty is rarer than it should be.
What Tavien is best at is the moment when a familiar topic reveals something unexpected — when the conventional wisdom turns out to be slightly off, or when a small shift in framing changes everything. They finds those moments consistently, which is why they's work tends to generate real discussion rather than just passive agreement.
Founder & Creative Director
Tavien Veyland has opinions about liv-inspired living concepts. Informed ones, backed by real experience — but opinions nonetheless, and they doesn't try to disguise them as neutral observation. They thinks a lot of what gets written about Liv-Inspired Living Concepts, Smart Home System Integrations, In-Depth Guides is either too cautious to be useful or too confident to be credible, and they's work tends to sit deliberately in the space between those two failure modes.
Reading Tavien's pieces, you get the sense of someone who has thought about this stuff seriously and arrived at actual conclusions — not just collected a range of perspectives and declined to pick one. That can be uncomfortable when they lands on something you disagree with. It's also why the writing is worth engaging with. Tavien isn't interested in telling people what they want to hear. They is interested in telling them what they actually thinks, with enough reasoning behind it that you can push back if you want to. That kind of intellectual honesty is rarer than it should be.
What Tavien is best at is the moment when a familiar topic reveals something unexpected — when the conventional wisdom turns out to be slightly off, or when a small shift in framing changes everything. They finds those moments consistently, which is why they's work tends to generate real discussion rather than just passive agreement.