I’ve cleaned enough laminate floors to know the frustration of finishing a room only to see streaks everywhere.
You’re probably here because your floors look worse after cleaning than before. Or maybe you’re worried about using the wrong product and damaging them. Both are valid concerns.
Here’s the thing: laminate is tricky. Too much water and it warps. Wrong cleaner and you get a cloudy film that won’t go away.
I’ve spent years figuring out what actually works. Not what the bottle says will work. What really works.
This guide shows you how to wash laminate flooring livpristhome the right way. I’ll walk you through daily maintenance and deep cleaning. You’ll learn which tools to use and which ones to avoid.
We’ve tested different methods and products on real laminate floors. The process I’m sharing here avoids the common mistakes that ruin floors and waste your time.
You’ll get a clear routine you can follow every time. Plus solutions for those stubborn stains that make you want to just throw a rug over them.
No fancy equipment needed. Just the right approach and a few basic supplies you probably already have.
Gather Your Supplies: The Essential Laminate Cleaning Toolkit
You need the right tools before you start.
I learned this the hard way when a friend called me last month. “I just scratched my entire kitchen floor,” she said. “I used my regular vacuum and now there are these lines everywhere.”
Turns out she’d left the beater bar on.
Here’s what you actually need to how to wash laminate flooring livpristhome without wrecking it.
The Non-Negotiables
A soft-bristle broom works great for daily sweeping. Or grab a vacuum with a hard floor setting. Just make sure that beater bar is off (those rotating brushes will scratch laminate faster than you’d think).
Why Microfiber Changes Everything
I always keep microfiber mops and cloths on hand. They trap dust better than anything else and they let you control moisture. That second part matters because laminate and water don’t mix well.
One cleaning pro I talked to put it simply: “Cotton mops hold too much water. Microfiber gives you just enough.”
Your Cleaning Solution Options
| Solution Type | What You Need | Best For |
|————–|—————|———-|
| DIY Mix | Water, white vinegar, drop of dish soap | Daily cleaning |
| Commercial Cleaner | pH-neutral laminate formula | Tougher jobs |
The DIY version costs almost nothing and works for regular maintenance. Mix it fresh each time (don’t store it).
If you’d rather buy something, look for pH-neutral cleaners made specifically for laminate. They’re worth the extra few bucks.
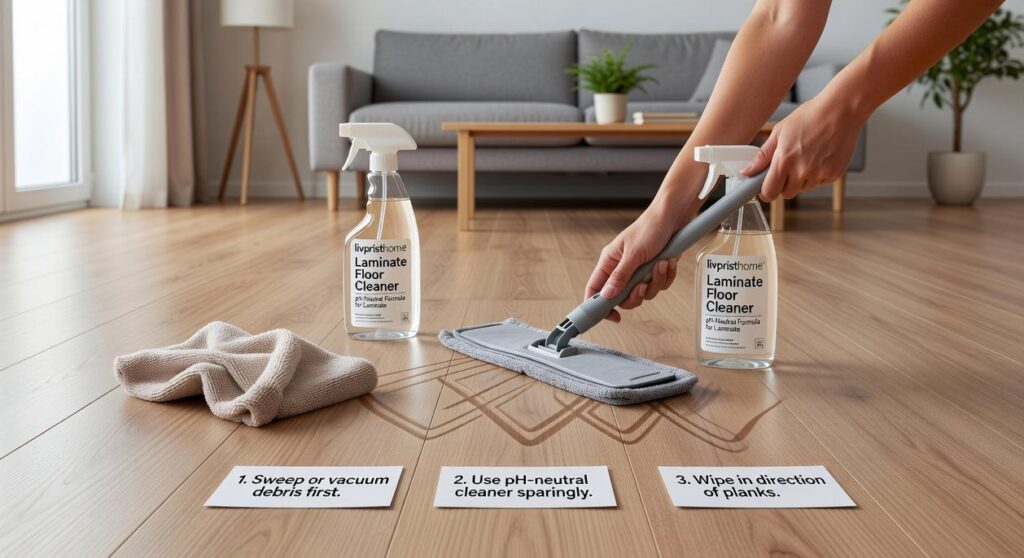
Step 1: Dry Prep is Non-Negotiable
You can’t skip this part.
I see people grab a mop and go straight to wet cleaning. Big mistake. When you mop over dirt and dust, you’re basically making mud that scratches your laminate with every pass.
Start with a good sweep or vacuum. Get everything up first.
Here’s what I do. I run a robot vacuum every morning before I even have coffee. Set it on a schedule and forget about it. Your floors stay clean between deep cleans and you’re not dragging grit around when you mop.
Takes two minutes to set up and saves your floors from years of tiny scratches.
Step 2: Mix Your Cleaning Solution
Keep this simple.
One gallon of water (cool or lukewarm, never hot) mixed with a quarter cup of white vinegar. That’s it.
Hot water breaks down the protective sealant on your laminate. I learned this the hard way after ruining a section near my kitchen island. The planks started looking dull and cloudy within weeks.
Cool water protects what you’ve got.
Step 3: The ‘Barely Damp’ Mopping Technique
This is where most people mess up.
Your mop should be almost dry when it touches the floor. I’m talking wring it out until your hands hurt, then wring it one more time. If water drips when you lift the mop, it’s too wet.
Why does this matter so much?
Water seeps into the seams between planks. The wood core swells. Your floor starts buckling and warping. I’ve seen floors ruined in months because someone thought wetter meant cleaner.
When you’re learning how to wash laminate flooring livpristhome style, think damp cloth, not wet mop.
Mop with the planks, not against them. Follows the grain and you won’t get streaks.
Work in small sections. The floor should dry almost immediately behind you.
Step 4: The Final Buff
Don’t walk away yet.
Grab a clean, dry microfiber cloth and go over everything one more time. This picks up any moisture you missed and brings out that showroom shine.
Takes maybe five minutes for an average room. But it makes your floors look professionally cleaned instead of just mopped.
Plus, you’re protecting your investment. Laminate that’s properly cared for lasts decades.
Damage Control: Cleaners and Tools You Must Avoid
I learned this lesson the hard way.
About three years back, I grabbed my steam mop (the one I swore by for tile) and went to town on my kitchen laminate. Figured clean is clean, right?
Wrong.
Within two weeks, I noticed the planks starting to warp near the seams. The edges were lifting. That’s when I realized I’d just forced water into every gap and joint, and laminate doesn’t forgive that mistake.
Cost me about $800 to replace those sections.
So yeah, I’m pretty serious about what not to use on laminate floors. Because once you damage that protective layer, you can’t undo it.
Here’s what you need to avoid:
- Steam mops and wet jet systems
- Traditional string mops with buckets
- Scouring pads and steel wool
- Ammonia-based cleaners
- Bleach or chlorine products
- Floor waxes and polishes
- Abrasive powders
Let me break down why each of these will wreck your floors.
The Water Problem
This is the biggest mistake I see people make.
Steam mops might seem perfect. They sanitize, they’re chemical-free, and they work great on tile. But laminate is basically a photo of wood on top of compressed fiberboard. That fiberboard? It swells when it gets wet.
The same goes for wet jets and traditional mopping. You’re putting way too much water on the surface. It seeps into seams, gets under the wear layer, and causes permanent damage.
If you want to know how to wash laminate flooring livpristhome style, the answer is barely damp. Not wet.
Abrasives and Harsh Chemicals
Scouring pads and steel wool will scratch right through the wear layer. That protective finish is thin. Once it’s gone, your floor looks dull and worn no matter what you do.
Ammonia and bleach strip that layer too. They’re too aggressive. You might think you’re deep cleaning, but you’re actually removing the protection that keeps your laminate looking new.
I’ve seen floors that looked cloudy and streaked after someone used ammonia. That cloudiness doesn’t buff out.
The Wax Trap
Some people think laminate needs wax or polish like hardwood does.
It doesn’t.
Laminate comes pre-finished. Adding wax just creates a sticky film that attracts dirt and looks terrible. Worse, it’s a pain to remove once it builds up.
I tried this once (before I knew better) and ended up with floors that felt tacky underfoot. Had to strip the whole thing with vinegar solution and start over.
Stick to the basics. Your laminate doesn’t need extra products. It just needs you to avoid the ones that’ll ruin it.
Advanced Tactics: Tackling Tough Stains and Scuffs
You know what drives me crazy?
When people act like every stain needs some expensive specialty cleaner. I’ve been dealing with floor disasters for years and most of the time you already have what you need.
Let me show you what actually works.
Scuff Marks
Those black streaks from shoes? Grab a pencil eraser. Seriously. Just rub it over the mark and watch it disappear. If you don’t have one handy, a tennis ball works too (I keep one in my cleaning caddy for this exact reason).
Grease and Ink
This is where most people panic and start scrubbing like maniacs. Don’t.
Put a tiny bit of rubbing alcohol on a microfiber cloth. Dab the stain. Don’t rub it in circles or you’ll just spread it around. Once the stain lifts, wipe the spot with a damp cloth to remove any residue.
I use this trick on everything from crayon marks (thanks to my nephew) to mystery grease spots. It’s part of how to wash laminate flooring livpristhome without losing your mind.
Chewing Gum or Wax
Here’s my honest take. This one requires patience and you can’t rush it.
Put an ice pack on the gum or wax until it’s completely hard. Then grab a plastic scraper or an old credit card and gently lift it off. The key word is gently. I’ve seen people gouge their floors because they got impatient.
Take your time with this one.
Long-Term Care: Functional Hacks for Lasting Beauty
Think of your floors like a car you want to keep running for 200,000 miles.
You wouldn’t skip oil changes or ignore weird noises. Same idea here. A few simple habits now save you from major headaches later.
Stop Problems at the Door
The best defense starts before dirt even hits your floor.
I put doormats at every entrance. Not the flimsy decorative ones either. Get mats that actually trap dirt and moisture before they reach your planks.
It’s like having a bouncer for your floors. Most of the damage never makes it inside.
Protect Against Furniture Scratches
Here’s something most people learn the hard way.
Moving a chair without felt pads is like dragging sandpaper across your floor. Even small shifts during dinner can leave marks.
I stick felt pads under every furniture leg. Takes ten minutes to do a whole room. Saves you from watching your floors get destroyed one scratch at a time.
Handle Spills Like They’re Urgent
When something spills, you’ve got a small window.
Grab a dry cloth and wipe it up right away. Don’t let moisture sit there thinking you’ll get to it later (you won’t, and your floor will remember).
This matters even more when you’re figuring out how to wash laminate flooring livpristhome. Water is not your friend here. Quick response keeps moisture from seeping between planks where it can cause real damage.
Enjoy Your Pristine Floors with Confidence
You now have everything you need to clean your laminate floors the right way.
No more guessing about what products to use or how wet your mop should be. You know the strategy that works.
The biggest mistake people make is using too much water or grabbing harsh chemicals that strip the finish. Both will wreck your floors over time.
But you can avoid all of that.
Stick to the barely damp mop method and gentle cleaners. That’s it. Your floors stay protected and they look great.
I’ve seen too many beautiful laminate floors get ruined by simple mistakes. Water seeping into seams. Streaky residue that never quite goes away. Dull spots where the finish wore down.
You don’t have to deal with any of that.
Try the barely damp mopping technique this week. You’ll see the difference right away. No streaks. No damage. Just clean floors that shine.
This is how to wash laminate flooring livpristhome the smart way. Keep doing it and your floors will look new for years.